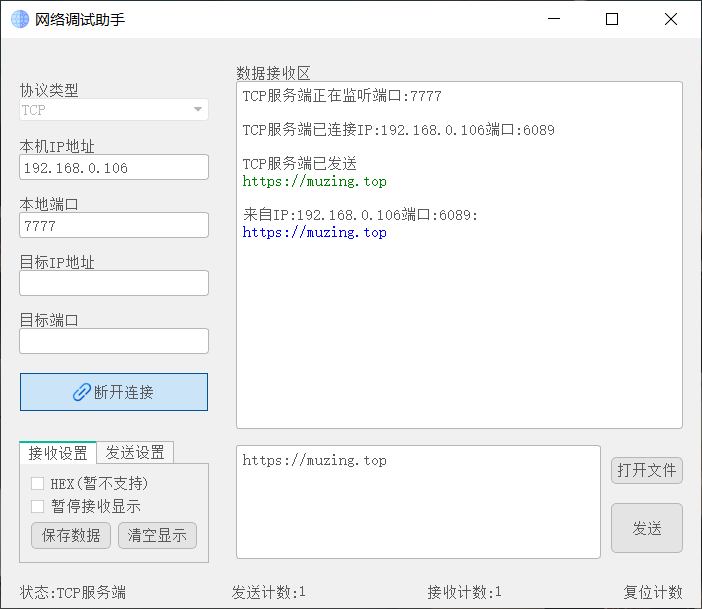
NetAssist_PyQt 项目已开源分享至GitHub ,如果这个项目和这篇博客对你有帮助的话,希望你能给我一颗小星星✨
寒假学习了计算机网络方面的知识,把之前稍有了解的socket编程进一步学习,加之从夏天学到冬天一直在学一直没学完的PyQt5终于学到70%入门了,于是萌生了给自己做一个好看又好用的网络调试助手小工具的想法,把socket编程、面向对象编程、PyQt编程、逻辑与界面分离、git多分支等新知识运用在实践中。也便于未来写自己的应用层程序时调试。
因为写这个程序的过程中还在继续学PyQt(实在是太多了,笔记代码仓库 都已经将近5000行300次commit了……),所以虽然基本功能(网络部分)早已实现,但为了继续优化界面,还是不停的在改动。先写篇博客记录这次实战中有趣的技术点。
实现一个“网络调试助手”程序,要求可以作为TCP服务端、TCP客户端、UDP服务端、UDP客户端接收发送信息,还具有重复发送、16进制发送接收、保存接收信息到txt文件等功能。
尽可能实现逻辑与界面分离:网络功能的逻辑 、界面功能的逻辑 、纯UI 代码分离。
即,网络模块只需略微修改一两行事件机制的代码即可移植到其他任何程序、在界面功能逻辑增加功能不会对其他部分造成影响、通过QtDesigner修改UI布局不会对其他部分产生影响。
纯UI界面由Qt Designer设计生成MainWindowUI.ui 文件后用pyuic5转换为Python代码(MainWindowUI.py ),只负责控件的显示与布局;
Qt Designer工具可以可视化实时编辑控件与布局,也可以实现比较细致的调整
界面逻辑由MainWindowLogic.py 实现,包括用户输入的检查、计数器的实现、重复发送、16进制发送、保存数据到txt等等。
例如,当用户点击“连接网络”按钮,先由这部分代码对用户输入的IP地址端口号等进行获取、检查,再结合协议类型判断连接类型,最后把确认无误的连接信息发送到网络部分进行真正的连接。这样就简化了网络部分的代码。
也有部分高级控件的功能是通过对Qt原生控件的重写实现的,保存在UI.MyWidgets.py 中,方便其他项目复用。比如带有IP地址输入验证功能的LineEdit、复位计数按钮是一个可以点击的Label
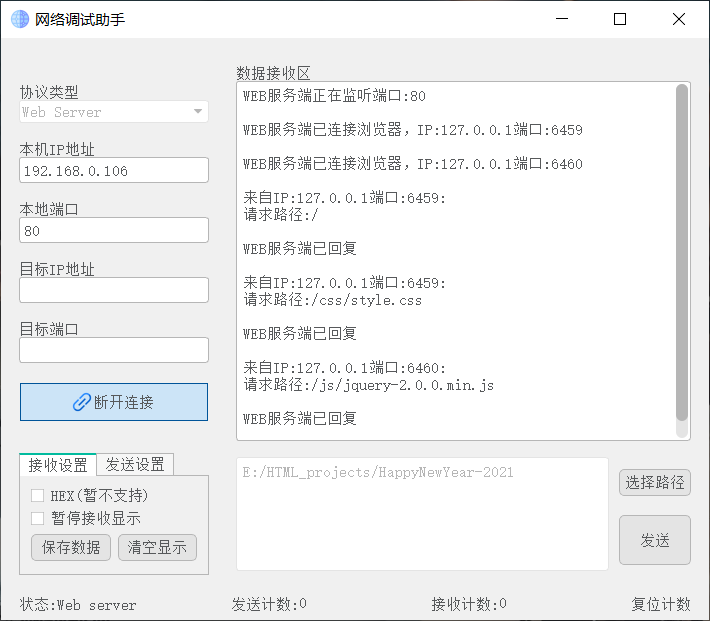
在Network包的三个模块下实现网络连接功能。Tcp.py包括TCP服务端、TCP客户端的连接建立、发送数据、断开连接等;Udp.py除了UDP服务端客户端,还有一个获得本机IP地址的函数get_host_ip;WebServer实现了一个简易的Web服务器。
1 2 3 4 5 6 7 8 from Network.Udp import get_host_ipfrom Network.Tcp import TcpLogicfrom Network.Udp import UdpLogicfrom Network.WebServer import WebLogicclass NetworkLogic (TcpLogic, UdpLogic, WebLogic):pass
网络模块只有信息反馈(事件处理)使用了PyQt5中的信号pyqtSignal,也就是说,如果用其他GUI甚至Flask实现了界面,只需要改动几行代码即可把Network全部功能完美移植过去 。
在main.py 中进行界面与网络功能的连接。通过类的多继承获得具有完整逻辑功能的界面和网络功能,再通过信号与槽的连接实现界面与网络功能的连接。
1
2
3
4
5
6
7
8
9
10
11
12
13
class MainWindow (WidgetLogic, NetworkLogic):def __init__ (self, parent=None ):super ().__init__(parent)
对部分我认为很好玩的代码做个简单说明
最初的设想是在Ubuntu上用ifconfig 加一些管道来截取仅含本机IPv4地址的字符串,在Windows用ipconfig如法炮制。经过一番努力,完美的失败了。换一个思路,打开搜索引擎搜索“Python 获取本机IP地址”,于是我得到了下面这段精巧的代码
1 2 3 4 5 6 7 8 9 10 11 import socketdef get_host_ip () -> str :"""获取本机IP地址""" try :'8.8.8.8' , 80 ))0 ]finally :return ip
如果直接用socket.gethostbyname(socket.gethostname())获取地址,很有可能是错误的(Vmware虚拟机的地址、127.0.0.1等)
通过UDP尝试连接’8.8.8.8:80’,不管是否连接成功,获得的本机IP一定是正确的。在Ubuntu和Windows上都可用,还省去了判断操作系统的大段代码。
Python官方文档 中socket.close()方法下面还有一个小Note
Note
close()shutdown()close()
close()close()shutdown()
在close()前显式调用shutdown()方法,以实现立即关闭连接,这可以解决我之前遇到的问题:明明TCP客户端已经关闭,但服务端仍尝试与其发送消息
下面是文档中shutdown方法的部分:
socket. shutdown(how )
Shut down one or both halves of the connection. If how is SHUT_RD, further receives are disallowed. If how is SHUT_WR, further sends are disallowed. If how is SHUT_RDWR, further sends and receives are disallowed.socket. shutdown(how )
关闭一半或全部的连接。如果 how 为 SHUT_RD,则后续不再允许接收。如果 how 为 SHUT_WR,则后续不再允许发送。如果 how 为 SHUT_RDWR,则后续的发送和接收都不允许。
所以在我的代码中,在socket.close()之前加上一行socket.shutdown(socket.SHUT_RDWR) 即可
1 2 3 4 5 6 7 8 9 10 11 12 13 14 15 16 17 18 class TcpLogic :def tcp_close (self ) -> None :"""功能函数,关闭网络连接的方法""" if self.link_flag == self.ServerTCP:for client, address in self.client_socket_list:list ()'已断开网络\n' elif self.link_flag == self.ClientTCP:'已断开网络\n'
1 2 3 4 5 6 7 8 9 10 11 12 13 14 15 16 17 18 19 20 21 22 import ctypesimport inspectdef _async_raise (tid, exc_type ):if not inspect.isclass(exc_type):type (exc_type)if res == 0 :raise ValueError("invalid thread id" )elif res != 1 :None )raise SystemError("PyThreadState_SetAsyncExc failed" )def stop_thread (thread ):
通过Qt Designer生成的MainWindowUI.py中只有一个Ui_Form类,下有setupUi、retranslateUi两个方法,前者记录了所有控件布局信息,后者记录界面上的所有文字内容(方便实现中文英语等多语言翻译切换)。
1 2 3 4 5 6 7 8 9 10 11 12 13 14 15 16 17 18 19 class Ui_Form (object ):def setupUi (self, Form ):"Form" )700 , 570 )600 , 500 ))def retranslateUi (self, Form ):"Form" , "网络调试助手" ))"Form" , "协议类型" ))0 , _translate("Form" , "TCP" ))
Ui_Form类并无QWidget窗口,需要在MainWindowLogic.py中创建一个继承自QWidget的QmyWidget类,把这个类实例传入Ui_Form.setupUi方法中。
1 2 3 4 5 6 7 8 9 from UI import MainWindowUIclass WidgetLogic (QWidget ):def __init__ (self, parent=None ):super ().__init__(parent)
显示创建MainWindowUI类的私有属性self.__ui,包含了可视化设计的窗体上的所有组件。只有通过 self.__ui才能访问窗体上的组件,外部无法访问,更符合面向对象封装隔离的设计思想 。
为IP地址输入框专门写了IPv4AddrLineEdit类,使得用户在输入IP地址时,只有键盘输入正确的格式才能真正输入,比如按下键盘上字母键是没有效果的。同时方便起见,把中文输入法输入的句号。也自动转化成英文输入法的句点.
(可以参考前面的博文PyQt5 输入验证器-正则方式 )
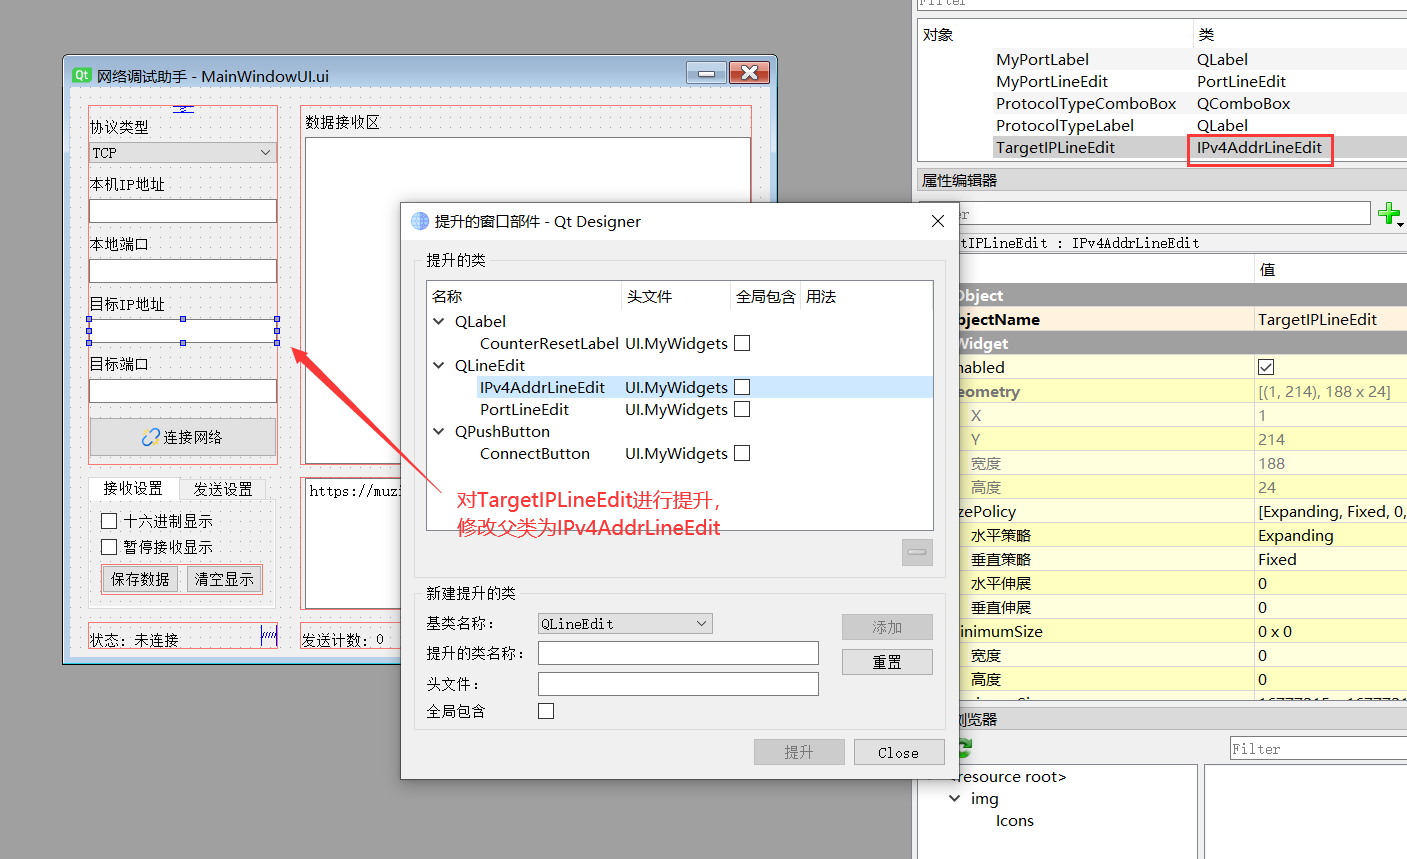
1 2 3 4 5 6 7 8 9 10 11 12 13 14 15 16 17 18 19 class IPv4AddrLineEdit (QLineEdit ):""" 带有验证输入IPv4地址功能的LineEdit """ class IPValidator (QRegExpValidator ):def validate (self, inputs: str , pos: int ) -> [QValidator.State, str , int ]:'。' , '.' )return super ().validate(inputs, pos)"((2[0-4]\\d|25[0-5]|[01]?\\d\\d?)\\.){3}(2[0-4]\\d|25[0-5]|[01]?\\d\\d?)" )def __init__ (self, parent=None ):super ().__init__(parent)
类似的,也为端口号的输入设置了验证器
1 2 3 4 5 6 7 8 9 10 11 12 13 14 15 16 17 18 19 class PortLineEdit (QLineEdit ):""" 带有验证器的端口号输入LineEdit """ class PortValidator (QIntValidator ):def fixup (self, inputs: str ) -> str :if len (inputs) == 0 :return '' elif int (inputs) > 65535 :return '7777' return inputsdef __init__ (self, parent=None ):super ().__init__(parent)0 , 65535 , parent)
然后在Qt Designer中把对应的控件进行提升即可
通过self.link_flag属性保存当前连接状态。界面逻辑的类WidgetLogic和网络功能的类NetworkLogic中都有这个属性:前者根据用户操作变化其值,后者根据其值实现对应网络功能。
self.link_flag 的值主要由WidgetLogic下的方法来设置:
1 2 3 4 5 6 7 8 9 10 11 12 13 14 15 16 17 18 19 20 21 22 23 24 25 26 27 28 29 30 31 32 33 34 35 36 37 38 class WidgetLogic (QWidget ):def __init__ (self, parent=None ):'TCP' def click_link_handler (self ):"""连接按钮连接时的槽函数""" if self.protocol_type == "TCP" and server_flag:elif self.protocol_type == "TCP" and not server_flag:elif self.protocol_type == "UDP" and server_flag:elif self.protocol_type == "UDP" and not server_flag:elif self.protocol_type == "Web Server" and server_flag and self.dir :def click_disconnect (self ):""" 实现断开连接的功能函数 """ 1 0 1 2 3 4
有了连接状态标识,就可以把目前的连接状态作为许多操作的判断依据,比如:
1 2 3 4 5 6 7 8 9 10 11 12 13 14 15 16 17 18 19 20 21 22 23 24 25 26 27 28 29 30 31 32 33 34 35 36 37 38 39 40 41 42 43 44 45 46 47 48 49 50 class TcpLogic :def __init__ (self ):def tcp_send (self, send_msg ):"""功能函数,用于TCP服务端和TCP客户端发送消息""" if self.link_flag == self.ServerTCP:if self.client_socket_list:for client, address in self.client_socket_list:'TCP服务端已发送' if self.link_flag == self.ClientTCP:'TCP客户端已发送' def tcp_close (self ):"""功能函数,关闭网络连接的方法""" if self.link_flag == self.ServerTCP:for client, address in self.client_socket_list:2 )list () '已断开网络\n' elif self.link_flag == self.ClientTCP:2 )'已断开网络\n' 1 0 1
通过self.link_flag实现了分用,不管Server还是Client,发送消息断开连接时调用的函数都是同一个。同理,main.py中,通过标识实现断开连接分用。
1 2 3 4 5 6 7 8 9 10 11 class MainWindow (WidgetLogic, NetworkLogic):def disconnect_signal_handler (self ):"""断开连接的槽函数""" if self.link_flag == self.ServerTCP or self.link_flag == self.ClientTCP:elif self.link_flag == self.ServerUDP or self.link_flag == self.ClientUDP:elif self.link_flag == self.WebServer:
该值除了在网络部分有应用,也用在一些界面逻辑的控制上,比如:
1 2 3 4 5 6 7 8 9 10 11 12 13 14 15 16 17 class WidgetLogic (QWidget ):def open_file_handler (self ):"""打开文件按钮的槽函数""" if self.link_flag in [self.ServerTCP, self.ClientTCP, self.ClientUDP]:elif self.link_flag == self.NoLink and self.protocol_type == 'Web Server' :dir = QFileDialog.getExistingDirectory(self, "选择index.html所在路径" , './' )str (self.dir ))False )
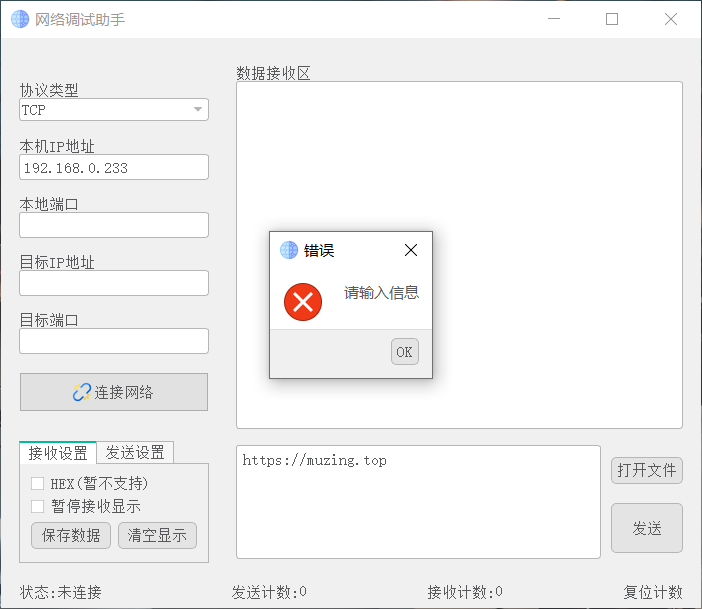
我的软件思路是,如果只输入本机端口号,则作为Server启动,绑定这个端口;如果只输入目标IP和目标端口,则作为Client启动,向该IP端口发送数据。所以必须对用户的异常输入(如只输入目标端口)进行处理:
未输入任何信息
1 2 3 4 5 6 7 8 9 10 def click_link_handler (self ):"""连接按钮连接时的槽函数""" if my_port == -1 and target_port == -1 and target_ip == '' :'错误' , '请输入信息' , QMessageBox.Ok, self)open ()True ) False ) return None
仅输入目标IP
1
2
3
4
5
6
7
8
9
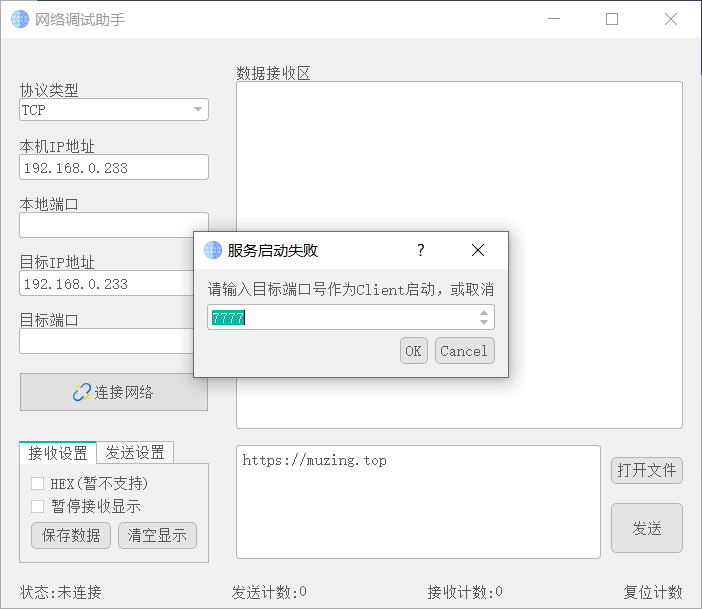
elif target_port == -1 and target_ip != '' :"服务启动失败" )"请输入目标端口号作为Client启动,或取消" )lambda val: self.__ui.TargetPortLineEdit.setText(str (val)))open ()False )return None
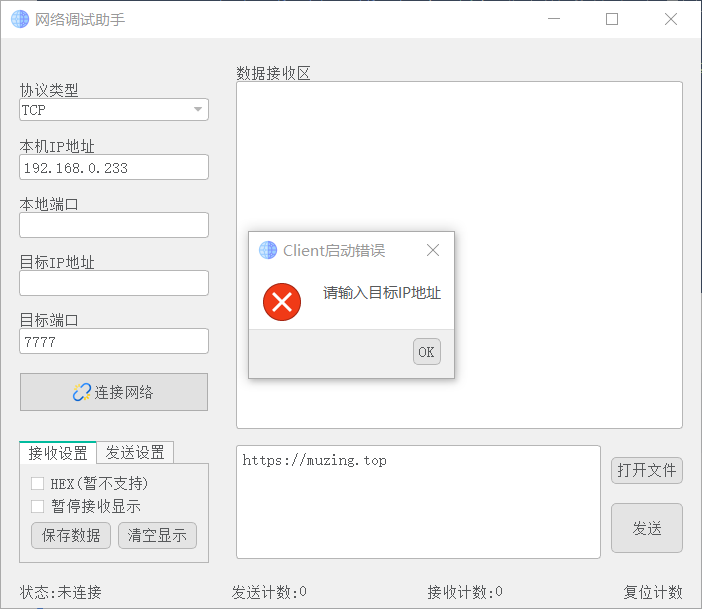
仅输入目标端口
1
2
3
4
5
6
elif target_port != -1 and target_ip == '' :'Client启动错误' , '请输入目标IP地址' , QMessageBox.Ok, self)open ()False )return None
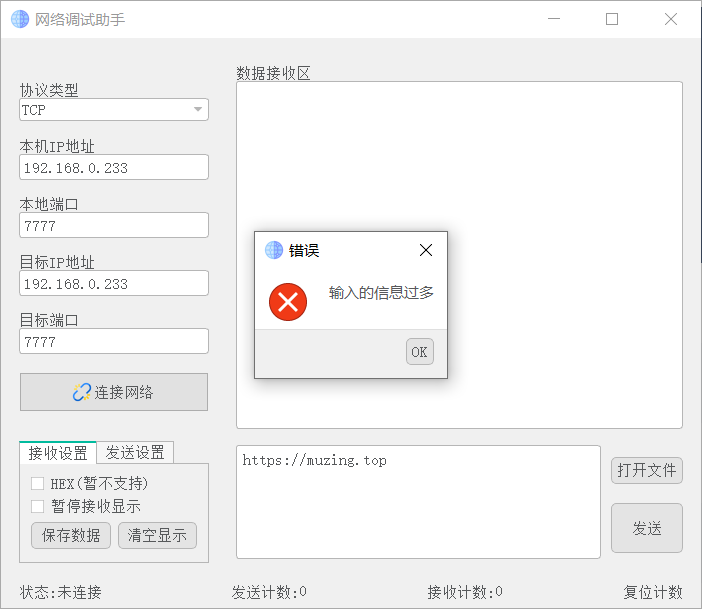
同时输入了本机端口、目标IP、目标端口
WebServer未选择工作目录
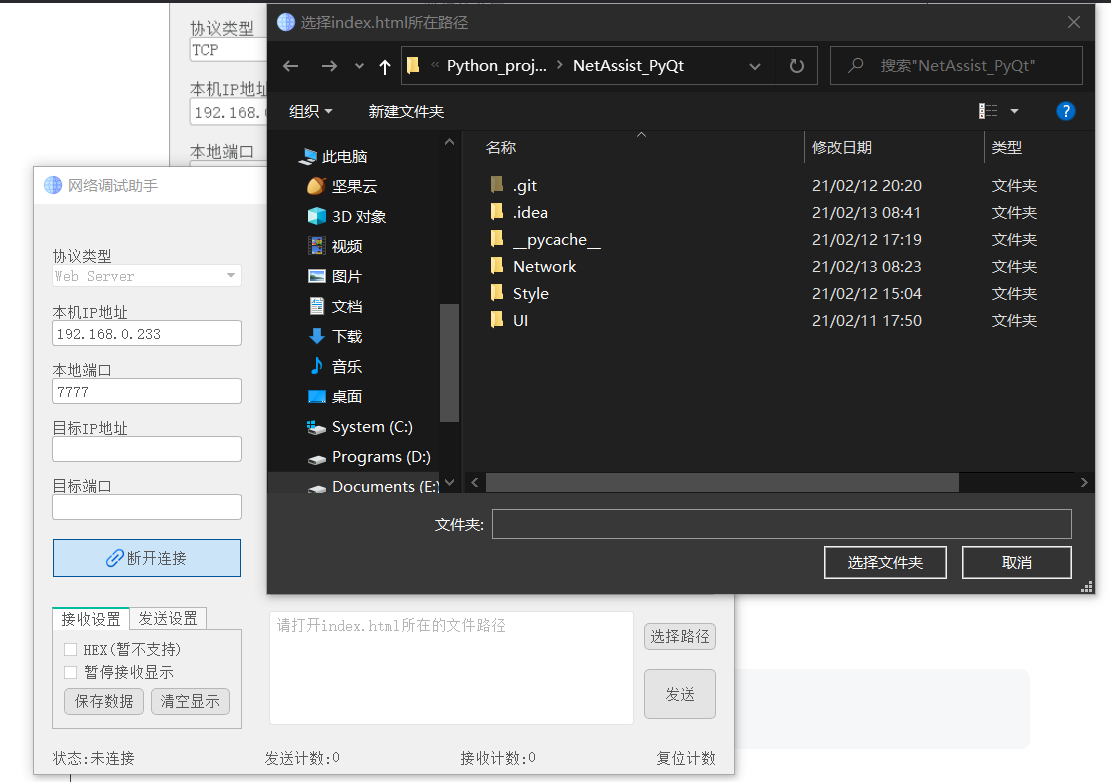
如果连接之前没有使用“选择路径”按钮选择工作目录,会在按下“连接网络”按钮时弹出文件夹选择对话框
1
2
3
4
5
6
7
8
9
10
11
12
13
def click_link_handler (self ):"""连接按钮连接时的槽函数""" if self.protocol_type == "Web Server" and not self.dir :dir = QFileDialog.getExistingDirectory(self, "选择index.html所在路径" , './' )if self.dir :str (self.dir ))False )else :False )return None
希望在下一版本加入以下功能:
【重要】优化网络模块,不能对抛出的异常视而不见
HEX 16进制收发信息
最小化到托盘
保存上一次的状态
如果有小伙伴对此感兴趣,欢迎提交PR
Network 包下的模块借鉴了Wangler2333 的开源项目 tcp_udp_web_tools-pyqt5
QSS美化的代码来自飞扬青云 的 QWidgetDemo 项目
在此表示感谢
