重要提示
翻译信息
原文链接:https://python.tutorials24x7.com/blog/how-to-install-python-3-9-on-ubuntu-20-04-lts
译者:muzing
允许转载,转载请保留以上翻译信息!
检查 Python 版本
译者注:翻译日期为 2021.8.25,距离原文发表日期 2020.10.18 已有一段时间,目前最新 Python 版本为 3.9.6,Ubuntu 20.04 LTS 默认 Python 版本为3.8.10
不同于 Ubuntu 18.04 LTS 等老版本,Ubuntu 20.04 LTS 并不默认使用 Python 2。在旧版本的 Ubuntu 中,我们可以使用python命令来检查 Python 2 的具体版本(尽管我们可以将其配置为使用Python 3)。在这一步中,我们将使用下面的命令来检查 Ubuntu 20.04 LTS 默认使用的 Python。
1
2
3
4
5
6
7
8
9
10
11
12
13
14
15
16
17
| # 刷新软件包索引
sudo apt update
# 检查Python版本
python --version
# 输出
Command 'python' not found, did you mean:
command 'python3' from deb python3
command 'python' from deb python-is-python3
# 检查Python版本
python3 --version
# 输出
Python 3.8.2
|
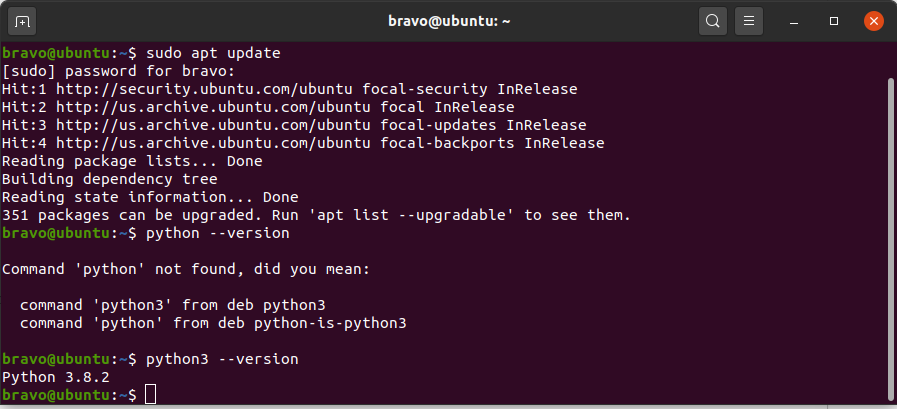
如图1所示,我们可以看到 Python 2 默认无法使用,且 Python 3.8 是在 Ubuntu 20.04 LTS 上预安装的

您可以从下一小节继续,使用 PPA 或者源代码编译安装最新版本的 Python。
在 Ubuntu 20.04 LTS 上不推荐 —— 可选项,也许您希望在继续下一节之前使用如下命令完全删除 Python。在删除现有的 Python 3.8 之前请务必仔细检查,因为还有几个包和程序依赖于它。如果您不确定,请保留系统上安装的现有版本的 Python,因为我们可以在同一系统上安装多个版本的 Python。
1
2
3
| # 删除 Python —— 在运行前请再三确认
# 这也会移除所有依赖于此的包,包括 gimp, mysql 等
sudo apt purge python3
|
提示:在运行了上面的步骤之后,我的系统崩溃了。
使用 PPA 源安装 Python
使用如下所示的命令安装 Python 3.9。在一些情况下,不推荐使用 PPA 安装 Python。这时您可以按照下一节的方法从源代码安装。
1
2
3
4
5
6
7
8
9
10
11
12
13
| # 更新包目录
sudo apt update
# 安装依赖
sudo apt install software-properties-common
# 添加 deadsnakes PPA 源
sudo add-apt-repository ppa:deadsnakes/ppa
# 按下 Enter 以继续
# 安装 Python 3.9
sudo apt install python3.9
|
上述命令将在 /usr/lib/python3.9 安装 Python 3.9。默认的 Python 3(即 Python 3.8)仍然安装于 /usr/lib/python3.8。现在使用如下所示的命令验证安装:
1
2
3
4
5
6
7
8
9
10
11
| # 检查 Python 版本
python3.8 --version
# 检查版本
Python 3.8.2
# 检查 Python 版本
python3.9 --version
# 检查版本
Python 3.9.0
|
您也可以使用相同的步骤通过相同的 PPA 源安装旧版本的 Python,如 Python 3.6、Python 3.7。安装路径会是 /usr/lib/python3.6 和 /usr/lib/3.7。通过这种方式,我们可以在同一系统上安装多个版本的 Python。
使用源代码安装 Python
在这一小节中,我们将通过源代码安装 Python 3.9,而不像上一节那样使用 PPA。
1
2
3
4
5
6
7
8
9
10
11
| # 刷新包目录
sudo apt update
# 卸载 上一小节使用 PPA 安装的 Python 3.9
sudo apt purge python3.9
# 刷新包目录
sudo apt update
# 安装依赖
sudo apt install build-essential zlib1g-dev libncurses5-dev libgdbm-dev libnss3-dev libssl-dev libreadline-dev libffi-dev libbz2-dev liblzma-dev sqlite3 libsqlite3-dev libgdbm-compat-dev
|
现在使用 wget 下载最新的 Python 3.9 发布,如下所示。
译者注:3.9.0早已不是最新版,请读者访问 https://www.python.org 检查当前最新的版本
1
2
| # Download Python 3.9.0
sudo wget https://www.python.org/ftp/python/3.9.0/Python-3.9.0.tar.xz
|
下载完成后解压
1
2
| # 解压
tar -xf Python-3.9.0.tar.xz
|
现在从源代码编译构建 Python,并使用如下所示的命令安装它。make 命令会花费一点时间来从源文件构建二进制文件。此外,使用 altinstall 选项来避免覆盖现有的安装
1
2
3
4
5
6
7
8
9
10
11
12
13
14
15
16
17
18
19
20
21
22
23
24
25
26
27
28
29
30
31
| # 切换目录
cd <path to download location>/Python-3.9.0
# 检查依赖
sudo ./configure --enable-optimizations
# Make - 编译安装 Python - 这会费点时间,休息一下再回来吧
sudo make
# 或者 - 指定使用的处理器核心数
sudo make -j 4
# 安装二进制文件
sudo make altinstall
# Switch active Python
# 切换活动的 Python
sudo update-alternatives --config python3
# 不会为 python3 显示任何选项
# 检查安装
python3 --version
# 呈现版本
Python 3.8.2
# 检查安装
python3.9 --version
# 呈现版本
Python 3.9.0
|
上面的命令将安装 Python 3.9 的最新版本,但不会像上面所示的那样可以通过 python3 命令使用它。下一节详细说明了从命令行使用 python3 命令调用 Python 3.9 的步骤。
切换默认版本(可选项)
如果您已经安装了多个次要版本的Python,如 python3.6、python3.7、python3.9 等,您可以使用下面提到的命令来使用 python3 命令替代命令行中的 python3.6 、python3.7、python3.9 等。我们也可以通过配置 active 命令切换到其他版本
注意:将 python3 配置为使用 PPA 或源代码安装的 Python 将禁用 python3 的默认安装(即 python3.8)。您可以使用不同的命令而不是 python3 以避免系统差异。
1
2
3
4
5
6
7
8
9
10
11
12
13
14
| # 添加使用 python3.7 的 python3 选项
sudo update-alternatives --install /usr/bin/python3 python3 /usr/bin/python3.7 1
# 添加使用 python3.8 的 python3 选项
sudo update-alternatives --install /usr/bin/python3 python3 /usr/bin/python3.8 2
# 添加使用 python3.9 的 python3 选项
sudo update-alternatives --install /usr/bin/python3 python3 /usr/bin/python3.9 3
# 确认版本
python3 --version
# 呈现版本
Python 3.9.0
|
由于我们提供了在多个 python3 版本之间切换的选项,所以可以使用如下所示的命令切换活动版本。
1
2
| # 切换活动的 Python 版本
sudo update-alternatives --config python3
|
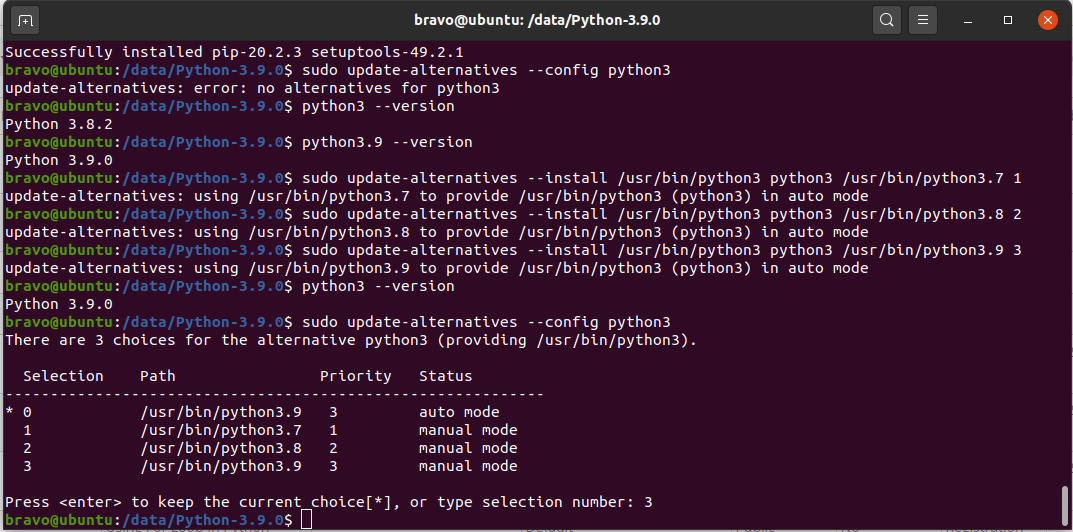
如图二所示,我使用了本地安装的 Python 3.9

一旦我们启用命令 python3 来引用我们使用源代码安装的 Python 3.9,终端就会停止工作。因此在关闭终端之前确保将其 fix 固定。如果您不小心关闭了终端,您也许可以安装 terminology 来修复终端,如下所示。
1
2
3
4
5
| # 更新终端脚本
sudo nano /usr/bin/gnome-terminal
# 替换第一行以使用 Python 3.8
#! /usr/bin/python3.8
|
除了破坏终端之外,在运行 sudo apt-get update命令时,还会出现错过 apt_pkg 的错误,如下所示。
1
2
3
4
5
6
7
8
9
10
11
12
13
14
15
16
| ubuntu@ubuntu:~$ sudo apt-get update
Hit:1 http://us.archive.ubuntu.com/ubuntu focal InRelease
Hit:2 http://ppa.launchpad.net/deadsnakes/ppa/ubuntu focal InRelease
Get:3 http://security.ubuntu.com/ubuntu focal-security InRelease [107 kB]
Get:4 http://us.archive.ubuntu.com/ubuntu focal-updates InRelease [111 kB]
Get:5 http://us.archive.ubuntu.com/ubuntu focal-backports InRelease [98.3 kB]
Fetched 317 kB in 3s (104 kB/s)
Traceback (most recent call last):
File "/usr/lib/cnf-update-db", line 8, in <module>
from CommandNotFound.db.creator import DbCreator
File "/usr/lib/python3/dist-packages/CommandNotFound/db/creator.py", line 11, in <module>
import apt_pkg
ModuleNotFoundError: No module named 'apt_pkg'
Reading package lists... Done
E: Problem executing scripts APT::Update::Post-Invoke-Success 'if /usr/bin/test -w /var/lib/command-not-found/ -a -e /usr/lib/cnf-update-db; then /usr/lib/cnf-update-db > /dev/null; fi'
E: Sub-process returned an error code
|
apt_pkg 可以使用如下所示的命令修复。
1
2
3
4
5
| # Navigate to default Python 3
cd /usr/lib/python3/dist-packages/
# 修复 apt_pkg
sudo ln -s apt_pkg.cpython-38-x86_64-linux-gnu.so apt_pkg.so
|
您还可以回退并修复 python3 命令,如下所示。
1
2
3
4
5
6
7
8
9
10
11
| # 移除 python3 链接
sudo rm /usr/bin/python3
# 回退到 python3.8
sudo ln -s /usr/bin/python3.8 /usr/bin/python3
# 更新终端脚本
sudo nano /usr/bin/gnome-terminal
# 替换第一行以使用 Python 3
#! /usr/bin/python3
|
您可以使用其他简称替换 python3 ,或者简单地使用 python3.9 以从终端访问(从源代码安装的)最新版本的 Python。
这就是在 Ubuntu 20.04 LTS 上安装最新的 Python 的方法。我们还学习了如何在同一系统上安装和切换多个版本的 Python。
Hello World
在这一节中,我们将会使用 nano 编辑器写我们的第一个 Python 程序。
1
2
3
| > sudo mkdir -p /data/programs/python
> cd /data/programs/python
> sudo nano helloworld.py
|
现在用Python编写第一个程序,如下所示,按 Ctrl + O 再按 Enter 以保存程序,然后按 Ctrl + X 退出编辑器。
1
2
|
print("Hello World !!")
|
使用我们安装的 python3 来运行程序,如下所示
1
2
3
4
5
6
7
| # 运行程序
python3 helloworld.py
# 或者
python3.9 helloworld.py
# 程序输出
Hello World !!
|
这就是写和运行Python程序的基本步骤。
总结
本教程提供了在Ubuntu 20.04 LTS上安装 Python 3.9 的步骤,并展示了在同一系统上管理多个 Python 版本的过程。

